Showing posts with label Faster. Show all posts

How To Port Forward: Time Capsule

| Labels: , , , , , , , , , , , , , , , , , , , , , , , | 359 comments |

If you don't know what that means, here's a definition:

"Port forwarding (sometimes referred to as tunneling) is the act of forwarding a network port from one network node to another. This technique can allow an external user to reach a port on a private IP address (inside a LAN) from the outside via a NAT-enabled router."

I'm sure port forwarding has many uses, but the main one I know is for BitTorrent. Configuring your router for Bittorent will make your downloads go much faster. I've seen guides on how to do this for every router imaginable at http://portforward.com/ but it doesn't say how to configure an Apple Time Capsule.

So here it is:

How To Port Forward: Time Capsule

Before doing anything, make sure you are connected to your Time Capsule's network.

Step #1: Find out your IP

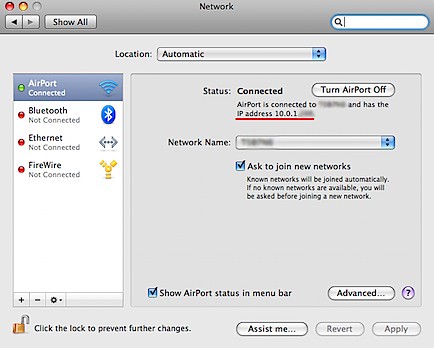
Open: System Preferences > Network

There you will see how you are connected to the internet. Under "Status" it will say the network and the IP address. Write down the IP.

Network.jpg

Step #2: Choose a port to forward and enter it in

The best ones are 49152–65534 but any will work. Once you've got one open up your Bittorent client and enter it in. I'm using Azureus and Transmission.

In Azureus it's done by clicking: Vuze > Preferences > Connection. Enter it in where it says "Incoming TCP / UDP listen port".

Picture 2.png

In Transmission it's done by clicking: Transmission > Preferences > Network. Enter it in where it says "Incoming TCP port".

Picture 3.png

Step #3: Open AirPort Utility

It's in Applications > Utilities > AirPort Utility

Picture 4.png

Step #4: Enable NAT Port Mapping Protocol

When you open AirPort Utility you get a window that shows all the different things your connected to. Double-Click the Time Capsule one you want to configure.

Picture 5.jpg

This will open a window that gives you access to all the Time Capsule's settings.

Click the "Internet" tab and make sure the checkbox "Enable NAT Port Mapping Protocol" is selected.

Enable.jpg

Step #5: Configure Port Mappings

Click the button right under "Enable NAT Port Mapping Protocol" that says "Configure Port Mappings".

This will take you to a screen that is accessible under: Advanced > Port Mapping.

Here it shows an "Allowed" list. We want to add the port you chose to it. Click the + sign under the list.

Ignore the part that says "Service". The 4 private and public port boxes enter the port you chose. In the "Private IP Address" box put the IP you wrote down earlier.

Port Mapping.jpg

When your done click continue.

The next part isn't too important. Name it whatever you want in the Description box (I did the name of the bittorent client) and click "Done".

Step #6: Update Time Capsule

Once you click done you may be asked if you want to update the changes. Click yes. Your Time Capsule will restart and save the changes.

Step #7: Enjoy!

Now that your time capsule is configured properly you should notice faster download speeds. Enjoy!
How-To Set Up A Hotmail Account On Mac Mail - Complete Guide

| Labels: , , , , , , , , , , , , , , , , | 105 comments |

Hotmail is one of the most popular email services out there. Millions of people use it (including me) and its great. But that said I do have one big problem with it...

Hotmail doesn't work with any mail client unless you buy a premium membership!

This means it doesn't work with Mac Mail or any other email applications for mac. But, luckily there's ways to work around this. If you've ever wanted to use your Hotmail, Windows Live or MSN email with Mac Mail this is how to do it.

Solution #1 - Switch Your Email

The best solution is to switch to a service that does work with Mac Mail (I'd suggest Gmail).

You may not want to do this but it's the best in the long run. I'm sure many people won't want to do this if everyone they know sends them info through their Hotmail address. I too didn't feel like telling everyone to switch.

So if that's the case then here it is.

Solution #2 - Download "MacFreePops"

This is best way I know for getting your mail out of hotmail. You may have heard of "httpmail". I've tried it and it failed, so I'll show you how I got it to work with MacFreePops.

  1. Download and Install MacFreePops
    Click here to get MacFreePops. Once it's downloaded move it to your application folder.

  2. Open Mac Free Pops
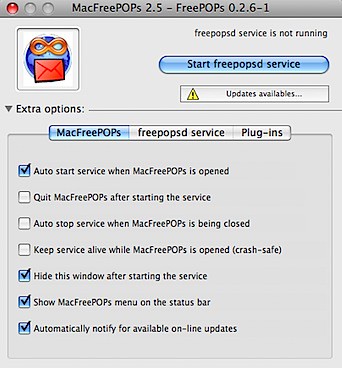
    When you first open it up the window will look something like this.
    MacFreePops1.tiff
    Before you start, make sure Mac Free Pops is updated. Click where it says "Updates Available" to download all the updates. Do this twice to get everything, after the second time don't worry if it says there are updates.
    Next check all the options you want. I've circled all the ones I have but you can do whatever you like.

  3. Check You Have The Right Settings and Start MacFreePops
    Click "freepopsd service". Make sure that window looks like this. Check that the circled things are set right too. When your all done click "Start freepopsd service".
    MacFreePops2.jpg
  4. Make a New Mail Account
    Open up Mail. Click "File > Add Account...".
    Mail1.jpg
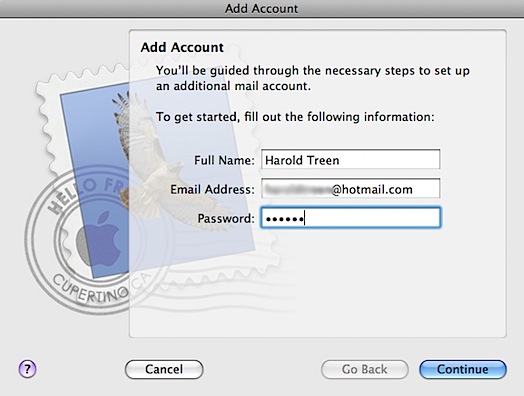
    Start setting up your new account by entering your Name, Complete email and Email password. Click "Continue" when your done.
    Mail2.jpg
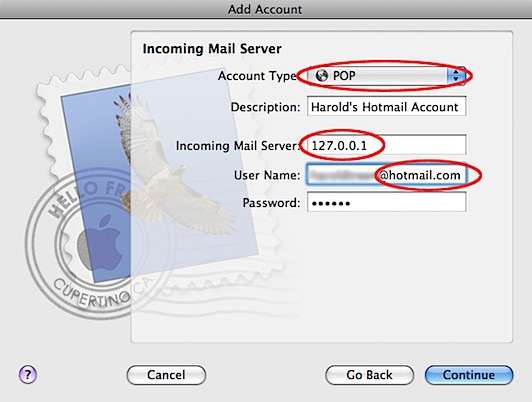
    Next you're asked to setup your Incoming Mail Server. To do this:
    1. Set the account type to POP.
    2. Enter any description you like.
    3. Set "127.0.0.1" as your Incoming Mail Server.
    4. Make sure the user name is your FULL email (includes the @hotmail.com, @live.com, @msn.com, etc.).
    5. Click Continue.

    If you get an error message ignore it and keep going.

    Mail3.jpg

    Ignore "Incoming Mail Security" and keep going to "Outgoing Mail Server". For this:

    1. Put in any description you like.
    2. For my outgoing mail server I use "smtp.gmail.com".
      I believe it works without authentication. If not you can set up a gmail account for free and use put in your user name and password for authentication. Try without authentication first and see how it goes. You can keep "Use only this server" checked.
    3. Click Continue.

    Mail4.jpg
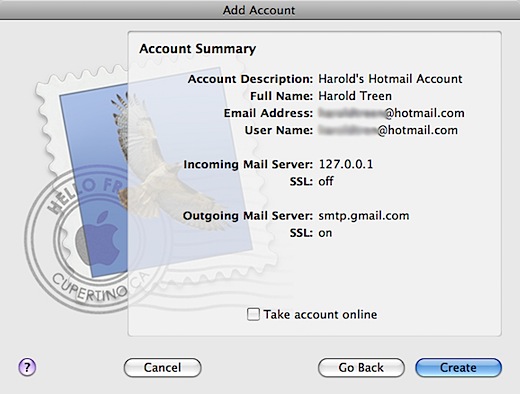
    Mail will then take you to a summary of all your settings. Make sure everything looks right and click "Create".

    Mail5.jpg
  5. Modify Your New Account's Settings

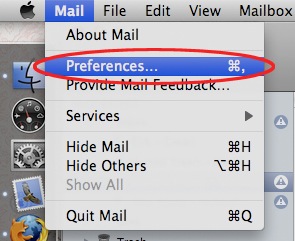
    The last thing you need to do is change a few account settings. Open Mail again and click "Mail > Preferences".

    Mail6.jpg

    To finish setting up your account:

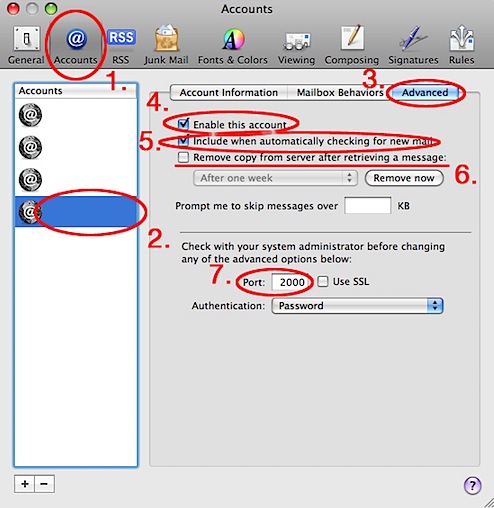
    1. Go to the "Accounts" section.
    2. Choose the account you just created from the left-hand menu.
    3. Go to the "Advanced" section.
    4. Make sure "Enable this account" is checked.
    5. Make sure "Include when automatically checking for new mail" is checked.
    6. I would suggest unchecking "Remove copy from server after retrieving a message:". If you ever need to switch back to using Hotmail the old way, all your e-mails will be gone. Better to just leave them.
    7. Change the port to "2000".

    Mail7.jpg

    Congratulations, your done!

Now whenever you click "Get Mail", Mac Mail will check your hotmail account for e-mails.
If it doesn't work, you probably have quit MacFreePops. Make sure it is open and that the service is running.
Now checking your email can be a lot quicker. Good Luck!

#1 - Clean Useless Startup Items

| Labels: , , , , , , , , , , , , , , | 1 comments |

"10 Ways To Speed Up Your Mac": Clean Useless Startup Items

When you log on to your computer, it has a few programs that it loads as soon as it starts.

The more it has to load, the longer it will take to load. You can cut down the load time by removing some of these startup items.

To do this go to:

System Preferences --> Accounts --> (Click the account you want to clean) --> Login Items

There you can find a list of Applications that launch at the start.

Look through them to see which ones you don't need.

When you find one you want to remove click it to highlight it and click the minus button.

Do this with all the accounts you want. This will make your computer start and run faster!