How To Port Forward: Time Capsule
| Labels: AirPort Utility, Azureus, Bittorent, Configure, Connection, Ethernet, Faster, LAN, Mac, Mac OS X, NAT, Network, Port Forward, Port Mapping, Private, Public, Router, Speed, TCP, Time Capsule, Transmission, UDP, Update, Vuze | 358 comments |If you don't know what that means, here's a definition:
"Port forwarding (sometimes referred to as tunneling) is the act of forwarding a network port from one network node to another. This technique can allow an external user to reach a port on a private IP address (inside a LAN) from the outside via a NAT-enabled router."
I'm sure port forwarding has many uses, but the main one I know is for BitTorrent. Configuring your router for Bittorent will make your downloads go much faster. I've seen guides on how to do this for every router imaginable at http://portforward.com/ but it doesn't say how to configure an Apple Time Capsule.
So here it is:
How To Port Forward: Time Capsule
Before doing anything, make sure you are connected to your Time Capsule's network.
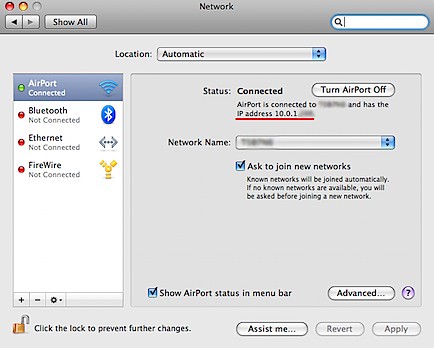
Step #1: Find out your IP
Open: System Preferences > Network
There you will see how you are connected to the internet. Under "Status" it will say the network and the IP address. Write down the IP.
Step #2: Choose a port to forward and enter it in
The best ones are 49152–65534 but any will work. Once you've got one open up your Bittorent client and enter it in. I'm using Azureus and Transmission.
In Azureus it's done by clicking: Vuze > Preferences > Connection. Enter it in where it says "Incoming TCP / UDP listen port".

In Transmission it's done by clicking: Transmission > Preferences > Network. Enter it in where it says "Incoming TCP port".

Step #3: Open AirPort Utility
It's in Applications > Utilities > AirPort Utility

Step #4: Enable NAT Port Mapping Protocol
When you open AirPort Utility you get a window that shows all the different things your connected to. Double-Click the Time Capsule one you want to configure.

This will open a window that gives you access to all the Time Capsule's settings.
Click the "Internet" tab and make sure the checkbox "Enable NAT Port Mapping Protocol" is selected.

Step #5: Configure Port Mappings
Click the button right under "Enable NAT Port Mapping Protocol" that says "Configure Port Mappings".
This will take you to a screen that is accessible under: Advanced > Port Mapping.
Here it shows an "Allowed" list. We want to add the port you chose to it. Click the + sign under the list.
Ignore the part that says "Service". The 4 private and public port boxes enter the port you chose. In the "Private IP Address" box put the IP you wrote down earlier.

When your done click continue.
The next part isn't too important. Name it whatever you want in the Description box (I did the name of the bittorent client) and click "Done".
Step #6: Update Time Capsule
Once you click done you may be asked if you want to update the changes. Click yes. Your Time Capsule will restart and save the changes.
Step #7: Enjoy!
Now that your time capsule is configured properly you should notice faster download speeds. Enjoy!